FTP Tutorial - Uploading Files
Home >> Building Your Website >> Free FTP Tutorial
FTP stands for file transfer protocal and it is the process of uploading files from your local environment to your web host.
How to Get Started
First, you need an FTP username and a password, and you can obtain this from your web host. So login to your hosting company's control panel and look for something that says "FTP Accounts" or "FTP Access."
If you use cPanel, you will see something like the screenshot below...

Click the FTP Accounts button and you will be taken to a screen that asks you to create your login credentials. This is what you are going to be entering into the FTP program.
Choose a username and password that would be tricky to figure out for security reasons. Use a combination of lowercase, uppercase, numbers and symbols.
Once you're done, you're now ready to download an FTP client.
FTP Applications
There are many FTP programs, but my two favorites are FileZilla and FireFTP.
FileZilla is free and pretty easy to learn. In fact, you can watch my video below to learn how to use it.
My other favorite program is a Firefox browser add-on called FireFTP. So if you use Firefox, you're gonna love this. It opens up in a new tab so you don't have to launch another program just to FTP.
To install it, launch the Firefox browser, go to the menu and select Tools >> Add-ons and in the search box, type "FireFTP."
When you see the add-on show up in the results, follow the prompts to install it. You will need to restart your browser.
Now, to access FireFTP go to Tools >> FireFTP (or Tools >> Web Developer >> FireFTP) from the Firefox menu.
Entering Your Credentials
No matter what program you choose, you first need to fill in the login information you created with your web host.
In the video above, I showed you how to do this with FileZilla. Since I use FireFTP more often, I'm going to use that as the example below. Even though no FTP program is completely the same as another, they all are very similar.
For FireFTP, launch the menu in the left-hand corner and select Create an Account.
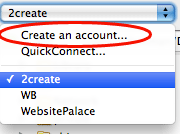
This is going to bring up a screen where you enter your hosting FTP login info that you created earlier.

In the Account Name field, enter anything you want. You can just use the name or domain name of your site.
In the Host field, enter yourdomain.com or ftp.yourdomain.com (check with your host to see what they prefer).
In the Login/Password field, enter the FTP credentials you created with your host.
Now click the Connection tab up top.

For most hosts, you need to check "Passive" mode. Now in the Local field, enter the path on your computer where your website files are stored. For example, if they are stored on your Desktop, you would enter /Users/[your_computer_name]/Desktop.
For the Remote field, refer to your hosting documentation to see what folder you need to connect to. For most hosts it is public_html, but it may be www or something else. This is the folder where your website is stored.
Neither one of these fields are mandatory, but they will make life a bit easier if you have the paths correct here. Because when you connect, you will already be inside the right folder where your files are stored both on your computer and on the web.
Now click OK.
You should now be viewing the home screen of FireFTP. Next, click the word Connect in the upper left-hand corner.

Now you should be connected to your website.
On the left side of the screen is your computer and on the right side is your website. The screen should look something like this...

The buttons circled in the center are what you use to move files back and forth between your computer and the web.
If you do not see your web files on the right, you may not be in the right Remote folder. Again, check with your web host for information on the correct folder name.
So to upload a file, just select it on the left side (your computer), and click the arrow that points to the right to upload it to the web. You can also do the same with an entire folder.
Just make sure you choose the right folder on the Remote side. For example, the root of your site (where your homepage is stored) is right inside the public_html folder. For static websites, this is where your homepage is stored. It should be called index.html or index.php.
If you use WordPress, your theme files are located in a folder called
wp-content and there is a folder inside there called themes. Click themes and you should see the name of the theme you're using for WordPress.
How to Upload Files
Just select the file or folder you want to upload with your mouse (on the left side where your computer is located), then click the green arrow to move it to your host.
Just keep in mind where you're uploading it to.
So if you upload a file named apple.gif to a folder off the root (public_html) called fruit, the URL/path to that image is
http://www.yourdomain.com/fruit/apple.gif
If you upload the apple.gif to the public_html (root) folder then the path is...
http://www.yourdomain.com/apple.gif
You can check to see if it uploaded properly by visiting the URL after uploading.
Backing Up Files
You can also use an FTP program to backup files and folders. Just do the opposite that you did to upload. Select the file or folder on the right and click the left arrow to move it to your computer.
So if you're using WordPress, you could backup your entire theme folder by navigating to wp-content/themes/[theme_name] and download it to your computer.
If you liked this, please share. Thanks!

 Hi, my name is